Vehicle Web Scraper

A simple webscraper project that takes car listing data from canadian used car websites. Click on the image to learn more!

Discord is an instant messaging and VoIP social platform that allows users to communicate through voice calls, video calls, text messaging and media. Communication either takes place in private or in a server. Servers are a collection of chat rooms in which users can communicate and are based off of a certain niche.
Unfortunately given the nature of discord servers as they grow in size, they become harder and harder to moderate unacceptable behaviour. In 2017 white supremacists used Discord to plan the "Unite the Right" rally in Charlottesville, Virginia.
One way to detect hate speech in text is to use what is known as Natural Language Processing (NLP) to determine the sentiment of the text to determine the sentiment of the text. On approach to sentiment analysis is to create a Neural Network (NN) model that is trained on a data set containing hate speech and will then yield a binary classification of whether or not the data constitutes hate speech. whether the data contains hate speech or not hate speech.
Before building the bot we need to make sure we have access to some good data sets that can be used to train our bot. After googling online I found an extremely useful website called hatespeechdata.com which has a collection of hate speech data not just in english, but in other languages as well. Browsing through the website, I will be using the following data set.
This dataset is comprised of tweets which are labelled as either offensive, hate speech or neither. Text in the dataset can be racist, sexist, homophobic or generally offensive.
| count | hate_speech | offensive_language | neither | class | tweet |
|---|---|---|---|---|---|
| Number of CrowdFlower(CF) users who coded each tweet. | Number of CF users who judged the tweet to be hate speech. | Number of CF users who judged the tweet to be offensive. | Number of CF users who judged the tweet to be neither offensive nor non-offensive. | Class label for majority of CF users. 0-hate speech, 1-offensive language 2-neither. | Text of the tweet. |
This dataset is one of the ones I will be using to train a sentiment analysis neural network. The key fields of interest within the dataset are the class field which indicates the level of offensiveness of the data and the tweet field which actually contains the text.
A popular approach to sentiment analysis is to use machine learning. The typical approach is to use a supervised learning model such as a neural network giving it a training set which is composed of two labels, a text label and a sentiment label corresponding to the sentiment of the text. In this case I'm interested in binary classification and as a result my sentiment will be either offensive or non offensive as the two possible classifications.
Processing data is quite tedious, if you wish to see how I processed and trained the models check out this link here.
Below is a brief summary of each of the models and a code snippet of their results and implementation.
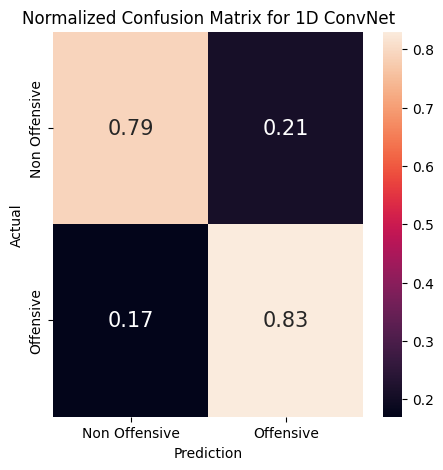
In summary a 1D ConvNet on text works similarly to a computer vision model in which the convolution will attempt to relate text with each other in the form of features in the same way image pixels are relate to identify physical characteristics in an image. Additionally compared to other models using a 1D ConvNet tends to converge quite quickly, looking at the training time for the data set composed of ~20k samples a model was trained in 2 mins with ~83% accuracy. The implementation of the model isn't too difficult and only requires a few lines.
model1 = Sequential()
model1.add(layers.Embedding(maxWords, 60, input_length=maxLen))
model1.add(layers.Conv1D(30, 6, activation='relu',
kernel_regularizer=regularizers.l1_l2(l1=2.5e-3, l2=2.5e-3),bias_regularizer=regularizers.l2(2.5e-3)))
model1.add(layers.MaxPooling1D(7))
model1.add(layers.Conv1D(30, 6, activation='relu',
kernel_regularizer=regularizers.l1_l2(l1=2.5e-3, l2=2.5e-3),bias_regularizer=regularizers.l2(2.5e-3)))
model1.add(layers.GlobalMaxPooling1D())
model1.add(layers.Dense(1,activation='sigmoid'))
model1.compile(optimizer='rmsprop',loss='binary_crossentropy',metrics=['acc'])
checkpoint1 = ModelCheckpoint("best_model1.keras", monitor='val_accuracy',
verbose=1,save_best_only=True, mode='auto',save_weights_only=False)
history = model1.fit(X_train, y_train, epochs=20,validation_data=(X_test, y_test),callbacks=[checkpoint1])
Looking at the model it does a fairly alright job in classification, but could perform much better. It also has an issue with false positives(FP) and false negatives(FN) and is likely to accidently classify offensive speech as non offensive and non offensive speech as offensive. We can see that 21% of offensive data is miss classified as offensive data which is a big problem.
In Summary an LSTM Model is a neural network model that has an architecture that allows it to have "memory" in that it can relate long term dependences of data with each other as a result LSTMs are well suited to text sentiment especially if we wish to determine sentiment of a long text element. Again the code implementation is not to difficult.
model2 = Sequential()
model2.add(layers.Embedding(maxWords, 25))
model2.add(layers.LSTM(20,dropout=0.5))
model2.add(layers.Dense(1,activation='sigmoid'))

model2.compile(optimizer='rmsprop',loss='binary_crossentropy', metrics=['accuracy'])
#Implementing model checkpoins to save the best metric and do not lose it on training.
checkpoint2 = ModelCheckpoint("best_model2.keras", monitor='val_accuracy', verbose=1,save_best_only=True, mode='auto',save_weights_only=False)
history = model2.fit(X_train, y_train, epochs=20,validation_data=(X_test, y_test),callbacks=[checkpoint2])
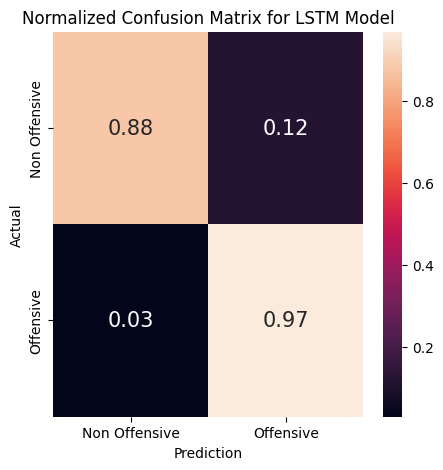
Looking at the model it does a fairly alright job in classification and is more accurate compared to the 1D ConvNeural Network. It's quite accurate when classifying both offensive and non offensive material. When considering false case scenarios such as false positives and false negatives it tends to over compensate with false positives suggesting the model is more cautious and tends to "over estimate" the offensiveness of the text. For the purpose of a chat having more FPs is better than FNs as you would rather be safe then sorry.
This model is similar to the previous one, but by introducing bidirectional layers the model can process text sequences in a forward and reverse direction as opposed to a forward direction. Here's the code:
model3 = Sequential()
model3.add(layers.Embedding(maxWords, 60, input_length=maxLen))
model3.add(layers.Bidirectional(layers.LSTM(30,dropout=0.6)))
model3.add(layers.Dense(1,activation='sigmoid'))
model3.compile(optimizer='rmsprop',loss='binary_crossentropy', metrics=['accuracy'])
checkpoint3 = ModelCheckpoint("best_model3.keras", monitor='val_accuracy', verbose=1,save_best_only=True, mode='auto',save_weights_only=False)
history = model3.fit(X_train, y_train, epochs=20,validation_data=(X_test, y_test),callbacks=[checkpoint3])
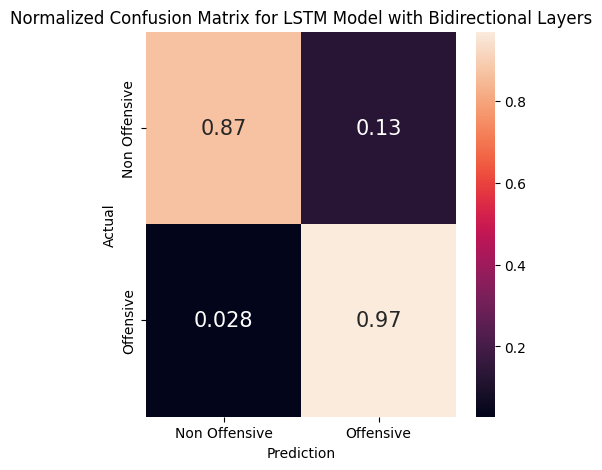
We can see the performance of this model is extremely similar to the LSTM model without any additional bidirectional layers. This model has the exact same result when considing false responses as the previous model in that it tends to over compensate.
Now that we can sufficiently obtain sentiment of a text it's time to create the actual backend which is the code for the discord bot. I will be using modified code from the following tutorial link.
import os
from dotenv import load_dotenv
from discord import Intents, Client, Message
from responses import getResponse

# Bot setup
intents = Intents.default()
intents.messages = True
client = Client(intents=intents)

# Message functionally where most of the work will be done
async def sendMessage(message, username, userMessage):
	"""
	Inputs:
	message(discord.Message) : A discord message sent from the user
	username(str) : Username of the user that sent the message
	userMessage(str) : Message content typed by the user

	Outputs:
	None

	Purpose:
	Function that allows the bot to send a message
	"""
	try:
		response = getResponse(username,userMessage)
		await message.channel.send(response)
	except Exception as e:
		print(e)


# Handling the startup for the bot
@client.event
async def on_ready():
	print(f'{client.user} is now operating')


# Handling the incoming messages
@client.event
async def on_message(message):
	if message.author == client.user:
		return

	#username = str(message.author)
	username = str(message.author.nick)
	userMessage = message.content
	channel = str(message.channel)

	print(f'[{channel}] {username}: "{userMessage}"')
	await sendMessage(message, username, userMessage)


# Launching the bot
def main():
	load_dotenv()
	TOKEN = os.getenv('DISCORD_TOKEN')
	client.run(TOKEN)


if __name__ == '__main__':
	main()
Most of the changes for the discord bot where done here in the response.py file. I essentially added some functions which detect if the text is offensive using a trained neural network (model training found here). once we're able to detect hateful speech then it's quite easy to get the bot to respond.
import ollama
import keras
from keras.models import load_model
from tensorflow.keras.preprocessing.text import Tokenizer
from keras.preprocessing.sequence import pad_sequences

import numpy as np
import pandas as pd

data = pd.read_csv("formattedKaggle.csv",dtype = str)
tokenizer = Tokenizer(num_words=5000)
tokenizer.fit_on_texts(list(map(str,list(data["tweet"]))))

def LLMWarning(username):
	"""
	Inputs:
	username(str): Username of the user

	Outputs:
	reponse(str): Returns warning response as string

	Purpose:
	takes in a username and outputs a warning to said user about offensive language. Warning is generated using a prompt to
	an LLM model (in this case llama3.1)
	"""

	messagePrompt = "Warn a user named "+username+"that using offensive language is wrong. Use a maximum of 150 characters"
	response = ollama.generate(model='llama3.1', prompt=messagePrompt)
	return response["response"]

def processMessage(message,maxWords,maxLen):
	"""
	Inputs:
	message(discord.Message) : Discord Message
	maxWords(int) : Number of maximum words we're considering in the tokenization
	maxLen(int) : Maximum length of sequence padding

	Output:
	processedText(np.array) : A numpy array which returns a vectorized representation of the text

	Purpose:
	Processes the text data into numpy arrays
	"""

	sequence = tokenizer.texts_to_sequences([message])
	processedText = pad_sequences(sequence, maxlen=maxLen)
	return processedText

def isOffensive(username,message):
	"""
	Inputs:
	username(str): Username of the discord user
	message(str): message by the discord user

	Outputs:
	offensivenessStatus(bool): boolean of offensiveness

	Purpose:
	Obtains a string of text and returns True if the string is offensive and False if the string is not offensive
	"""

	processedMessage = processMessage(message,5000,200)
	#print(message)
	analyzer = load_model("best_model3.keras")
	score = int(np.round(analyzer.predict(processedMessage))[0])
	#print(score)
	offensivenessStatus = (score == 1)

	return offensivenessStatus

def getResponse(username,userMessage):
	""""
	Inputs:
	Username(str): Username of the discord user
	userMessage(str): Message of the discord user

	Outputs:
	response(str): String corresponding to some generated respoinse

	Purpose:
	Following function takes in a message, if the message is offensive return an LLM generated warning. If not return nothing
	"""
	message = userMessage
	print(message)
	status = isOffensive(username,message)
	if status:
		return LLMWarning(username)
	else:
		""
As an added bonus I added ollama and used a llama 3.1 LLM model to make the warnings by the discord bot more personalized and less generic.
